Introduction
Moving to a new home is exciting, but when you own a motorcycle, the logistics become more complex. Your bike isn’t just another possession—it’s a significant investment that requires special care during relocation. Whether you’re moving across town or across the country, understanding how to move a motorcycle safely is essential to protect your prized two-wheeler from damage. This comprehensive motorcycle moving guide will walk you through every step of the process, from preparation to arrival, ensuring your bike reaches its destination in perfect condition.
Why Proper Motorcycle Moving Matters
Preventing Damage During Transit
Motorcycles are precision machines with delicate components that can easily suffer damage during relocation. A single scratch on the fuel tank, a bent mirror, or damaged fairings can cost hundreds to repair. Unlike cars, motorcycles lack the protective shell that shields them from bumps and scrapes. Proper motorcycle moving methods protect not only the exterior but also critical mechanical components like the suspension, brakes, and drivetrain. Understanding the risks involved helps you make informed decisions about how to move your bike safely.
Insurance and Liability Considerations
When moving your motorcycle, insurance coverage becomes paramount. Whether you’re using professional motorcycle movers or handling it yourself, knowing what’s covered can save you from financial headaches. Most homeowner’s insurance policies don’t cover vehicles in transit, and standard auto insurance may have limitations. If you hire a relocation company, verify their insurance coverage and understand their claims process. Documenting your bike’s condition before the move is your best defence if something goes wrong.
Assessing Your Moving Options
Professional Motorcycle Moving Services
Hiring motorcycle moving companies is often the safest choice for long-distance relocations. These specialists have the equipment, experience, and insurance to properly handle your bike. They offer door-to-door service, provide tracking, and use specialized trailers designed specifically for motorcycles. While more expensive than DIY methods, professional services eliminate the stress and physical labour of moving your bike yourself.
DIY Moving Methods
For budget-conscious riders, DIY motorcycle moving can save significant money. This approach involves renting a trailer or truck and handling the loading, securing, and relocation yourself. While it requires more effort and careful planning, many riders successfully move their bikes this way. You’ll need proper equipment including tie-down straps, wheel chocks, and potentially ramps. The key is having the right knowledge and taking your time to do it correctly.
Riding It to Your New Location
If distance and weather permit, riding your motorcycle to your new home might be the most enjoyable option. This works well for local or regional moves but becomes impractical for moving motorcycle long distance or when dealing with extreme weather conditions. Consider factors like your riding experience, road conditions, and whether you’ll have support along the way. Remember, you’ll be dealing with the stress of relocating while navigating potentially unfamiliar routes.
Pre-Move Preparation Checklist
Documenting Your Motorcycle’s Condition
Before any move, create a detailed record of your motorcycle’s current condition. Take photographs from every angle, capturing close-ups of any existing scratches, dents, or imperfections. This documentation serves as crucial evidence if damage occurs during relocation. Date-stamp your photos and store them safely. Many riders also create a video walkthrough, providing narration about the bike’s condition. This motorcycle moving checklist item is non-negotiable and takes only 15 minutes.
Cleaning and Maintenance Before Moving
A clean motorcycle makes inspection easier and shows respect for anyone handling your bike. Wash it thoroughly, removing dirt and grime that could hide damage. Check tire pressure, ensuring they’re properly inflated for the journey. Inspect for loose parts or accessories that might fall off during transit. This is also an excellent time to address any minor maintenance issues. Prepare motorcycle for moving by tightening mirrors, securing saddlebags, and removing any aftermarket accessories that could be damaged or stolen.
Draining Fluids or Securing the Tank
Fluid management is crucial for safe relocation. Many bike moving services require the fuel tank to be no more than one-quarter full to reduce fire risk and weight. Some situations may require completely draining the tank, especially for long-term storage during moves. Check your moving provider’s requirements. Ensure the gas cap is tightly secured and consider using a fuel stabilizer if the bike will sit for an extended period. Oil and coolant levels should be checked but typically don’t need draining.
Disconnecting the Battery
Disconnecting your motorcycle’s battery prevents electrical drain and reduces fire risk during relocation. Remove the negative terminal first, then the positive. Secure the terminals so they don’t accidentally reconnect. This simple step is particularly important for bikes with sensitive electronics or alarm systems. Wrap the terminals in cloth or tape to prevent them from touching metal surfaces. This motorcycle packing tip takes five minutes but provides significant peace of mind.
Choosing the Right Moving Method
Enclosed vs. Open Trailer Moving
Enclosed trailers offer maximum protection from weather, road debris, and prying eyes. They’re ideal for valuable, vintage, or custom motorcycles where scratches or exposure could cause significant damage. However, they cost more than open trailers for motorcycle relocation. Open trailers are more affordable and perfectly adequate for most bikes, though they expose your motorcycle to the elements. Consider your bike’s value, weather conditions during relocation, and your budget when deciding.
Using a Moving Truck
If you’re already renting a moving truck for household items, adding your motorcycle makes economic sense. Ensure the truck has sufficient space and a ramp for loading. Your bike will share space with furniture, so proper positioning and securing becomes critical. Place the motorcycle toward the front of the truck where it’s less likely to shift. Use wheel chocks to stabilize it and never rely solely on the kickstand. This method works well for local moves but requires careful planning.
Motorcycle Moving Companies
Specialized motorcycle moving companies handle nothing but bikes, giving them unmatched expertise. They understand the nuances of different motorcycle types and have dealt with every possible relocation challenge. While researching motorcycle moving companies near me, read reviews, verify insurance coverage, and get multiple quotes. Ask about their loading procedures, estimated transit times, and what happens if delays occur. Reputable companies provide contracts detailing their responsibilities and your rights.
Hiring a Specialized Bike Mover
Beyond general motorcycle movers, some companies specialize in specific bike types—sport bikes, cruisers, or vintage motorcycles. These specialists often provide white-glove service, including climate-controlled relocation and extra care for rare or valuable bikes. They understand the specific needs of high-end motorcycles and cater to collectors and enthusiasts. While premium-priced, their expertise justifies the cost for certain bikes.
How to Secure Your Motorcycle Properly
Essential Tie-Down Techniques
Proper securing prevents your motorcycle from tipping or shifting during relocation. Use at least four high-quality tie-down straps rated for your bike’s weight. Attach straps to solid mounting points on the bike’s frame, never to handlebars or plastic fairings. Compress the suspension slightly to create tension that keeps the bike stable. The goal is firm securing without over-tightening, which could damage components. Secure motorcycle during move by checking strap tension periodically during long trips.
Using Wheel Chocks and Straps
Wheel chocks are essential for DIY motorcycle moving, providing a stable base that prevents forward or backward rolling. Position the front wheel firmly in the chock, then secure it with straps. Some riders also use rear wheel chocks for additional stability. Canyon dancers or soft loops protect handlebar clamps and bodywork from strap damage. These inexpensive accessories distribute strap pressure and prevent scratching chrome or damaging cables.
Protecting Vulnerable Parts
Mirrors, turn signals, and exhaust pipes are particularly vulnerable during relocation. Remove or fold mirrors if possible, or wrap them in bubble wrap. Cover the tank and fairings with soft blankets or motorcycle covers to prevent scratches from shifting cargo or accidental contact. The exhaust can be protected with heat-resistant covers. Taking these extra precautions ensures your bike arrives looking exactly as it left.
Cost Breakdown: What to Expect
Professional Moving Service Costs
The bike moving cost varies widely based on distance, relocation type, and bike size. Expect to pay anywhere from $300 to $800 for cross-country enclosed moving, while shorter distances might cost $150 to $400. Open trailer relocation typically costs 30-40% less than enclosed. Get quotes from multiple providers and understand what’s included—pickup, delivery, insurance coverage, and any additional fees. Some companies charge extra for expedited service or difficult access locations.
DIY Moving Expenses
Handling relocation yourself reduces costs but isn’t free. Truck rental runs $50-$150 per day plus mileage, fuel, and insurance. Quality tie-down straps cost $50-$100 for a set of four, wheel chocks run $50-$150, and you may need ramps ($100-$300). Factor in your time and physical effort. While cost of moving motorcycle yourself might save money, calculate total expenses honestly before committing.
Money-Saving Tips
Book moving services during off-peak seasons when demand drops. Spring and summer see higher prices due to increased demand. Flexible pickup and delivery dates can reduce costs significantly. Some companies offer discounts for multiple motorcycles or military personnel. If you’re comfortable with longer transit times, slower relocation options cost less than expedited service. However, never sacrifice safety and insurance coverage solely to save money.
Insurance Coverage for Your Move
Understanding Moving Insurance
Professional relocation companies typically offer basic coverage included in their rates, covering a specific amount per pound of your bike’s weight. This rarely covers your motorcycle’s full value. Purchasing additional insurance through the moving company or your own insurance provider bridges this gap. Read the fine print carefully—coverage may exclude certain damage types or have deductible requirements.
What Your Policy Covers
Standard motorcycle insurance policies usually don’t cover relocation damage unless you’re riding the bike. Check with your insurance agent about adding temporary moving coverage. Some homeowner’s or renter’s insurance policies might provide limited coverage, but this varies significantly. Understanding exactly what’s covered before your bike leaves prevents unpleasant surprises if damage occurs. Get all coverage details in writing.
Filing Claims if Damage Occurs
If damage happens during relocation, document it immediately with photos and detailed notes. Notify the moving company within the timeframe specified in your contract—usually 24-48 hours. Your pre-move documentation becomes crucial evidence proving the damage occurred during relocation. Professional companies should have straightforward claims processes, but be prepared to follow up persistently. Keep copies of all correspondence and don’t sign any release forms until you’re satisfied with the resolution.
Day-of-Move Best Practices
Final Inspection Before Loading
On moving day, conduct one last inspection of your motorcycle. Check fluid levels, tire pressure, and ensure all loose items are removed or secured. Verify that your documentation is complete and accessible. If using professional movers, be present during loading to answer questions and observe their process. This isn’t about micromanaging but ensuring everyone understands any special considerations for your specific bike.
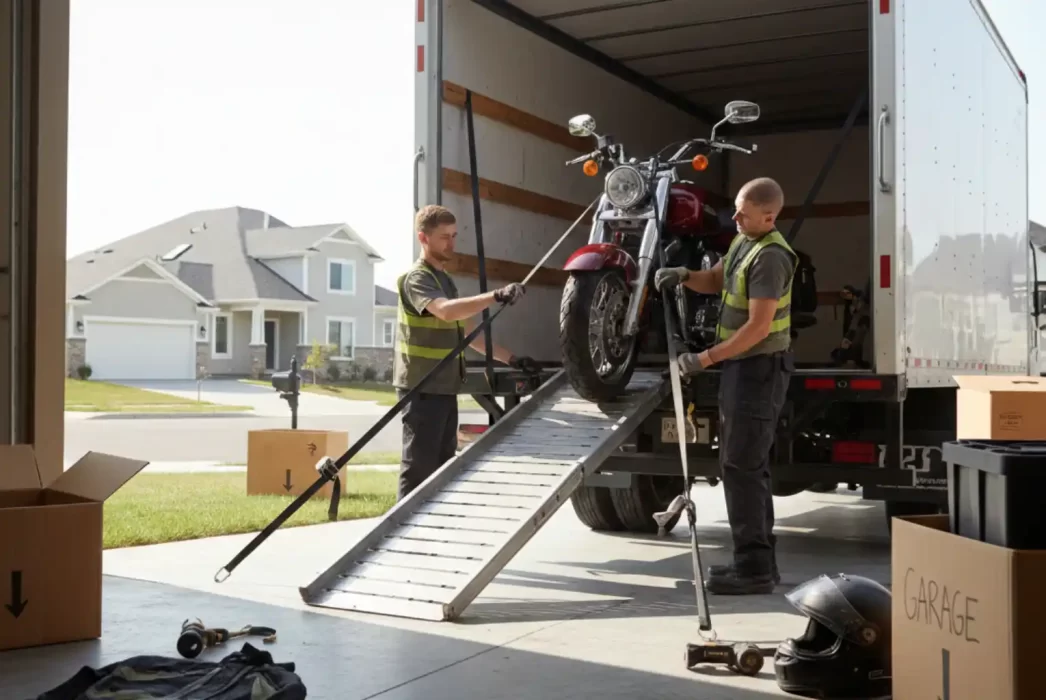
Loading Your Motorcycle Safely
Loading requires patience and proper technique. Use sturdy ramps with good grip and adequate weight capacity. Never rush this process—most loading accidents happen due to hurrying. Have at least one helper for guidance and support. Roll the bike up slowly with engine off, using steady pressure. Once positioned, engage the securing process immediately. If you’re uncomfortable loading alone, professional help is worth the investment.
Route Planning Considerations
If moving the bike yourself, plan your route carefully. Avoid rough roads that could jostle your cargo. Consider height restrictions if using an enclosed trailer. Plan for regular stops to check your bike’s security—every 50-100 miles initially, then every 100-150 miles once you’re confident everything is stable. Weather forecasts help you avoid driving through storms that could damage your bike or make driving dangerous.
After Arrival: Post-Move Checklist
Inspecting for Moving Damage
Before unloading, photograph your motorcycle in the trailer or truck. Once unloaded, conduct a thorough inspection comparing its condition to your pre-move documentation. Check for scratches, dents, leaks, or any mechanical issues. Test all controls—brakes, throttle, clutch, and lights. If you spot damage, document it immediately and contact your moving provider or insurance company right away.
Reconnecting and Refueling
Reconnect the battery, positive terminal first, then negative. Check all fluid levels and top off as needed. If you drained the fuel tank, refill it with fresh gasoline. Let the bike sit for a few minutes after refueling to allow fuel to circulate through the system. Check tire pressure again, as it may have changed during relocation or due to temperature differences at your new location.
Test Ride and Registration Updates
Before hitting the road regularly, take a short test ride around your neighborhood. Listen for unusual sounds and feel for any handling issues. Everything should feel normal. Don’t forget administrative tasks—update your motorcycle registration with your new address, notify your insurance company of your new location, and research local riding routes. Some states require you to obtain new license plates when relocating, so check your new state’s DMV requirements.
Common Mistakes to Avoid
Inadequate Securing Methods
The most common relocation mistake is improper or insufficient securing. Using cheap straps, attaching to weak points, or failing to compress the suspension properly can lead to your bike tipping during the move. Never use bungee cords as primary securing devices—they lack the strength and reliability of ratchet straps. Over-tightening is equally problematic, potentially damaging suspension components or fairings. Find the balance between secure and safe.
Ignoring Weather Conditions
Weather significantly impacts motorcycle relocation. Extreme heat can damage rubber components and increase the risk of fuel vapor. Cold weather can affect tire pressure and make straps more brittle. Rain and moisture can cause rust or electrical issues. If moving in open trailers, use waterproof covers that won’t blow off at highway speeds. Check forecasts and adjust your travel plans if severe weather is predicted.
Skipping Documentation
Failing to document your bike’s condition before relocation is a costly mistake. Without photographic evidence, proving moving-related damage becomes nearly impossible. Insurance claims often fail without proper documentation. Spend the extra 15 minutes taking comprehensive photos—it could save you thousands of dollars. Similarly, keep all receipts, contracts, and correspondence related to your motorcycle relocation.
Conclusion
Moving your motorcycle safely requires planning, preparation, and attention to detail, but the effort protects your valuable investment. Whether you choose professional motorcycle movers or handle the DIY motorcycle moving yourself, following this motorcycle moving guide ensures your bike arrives at your new home in perfect condition. From proper securing techniques to insurance considerations, each step plays a crucial role in successful motorcycle relocation. Remember that cutting corners might save a few dollars but risks damaging a bike worth thousands. Take your time, use quality equipment, and don’t hesitate to seek professional help when needed. Your motorcycle has provided countless miles of enjoyment—it deserves care and respect during the moving process. With the right approach and this complete guide, you’ll be riding at your new address before you know it.
FAQs
Q: What’s the cheapest way to move a motorcycle?
A: The most affordable option is riding it yourself if distance permits. For longer moves, renting a truck and handling relocation yourself costs less than professional services but requires proper equipment and knowledge.
Q: How much does it cost to move a motorcycle across states?
A: Cross-country motorcycle moving typically costs $300-$800 for enclosed relocation and $200-$600 for open trailer moving, depending on distance, bike size, and season.
Q: Can I keep items in my motorcycle during relocation?
A: Most professional moving companies prohibit leaving items in or on your motorcycle due to weight distribution, security, and liability concerns. Remove all personal belongings before relocation.
Q: How long does motorcycle moving take?
A: Transit times vary by distance and service level. Cross-country relocations typically take 5-10 days, while regional moves might take 2-5 days. Expedited services reduce these timeframes.
Q: Do I need special insurance for motorcycle relocation?
A: Basic coverage is usually included with professional moving services, but it’s often inadequate. Consider purchasing additional coverage through the relocation company or adding temporary moving coverage to your existing motorcycle insurance policy.